Bolt Tightening Sequence: Why it is So Important in Industrial Equipment Maintenance
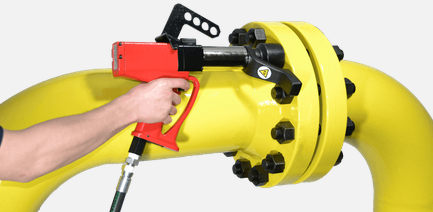
If you have an industrial facility where operations involve dealing with shafts, flanges, and bearings, among other facilities, bolts are no doubt some of the most critical components. Indeed, bolts are used in every product, equipment, or project you have seen out there. Yes, your car, door, printer, and farm machinery have them, and it is paramount to ensure they are tightened well. For industrial operation tasks that use flanges and couplings, whether on-site or off-site, one question that keeps coming up is, “what is the right tightening sequence?”
The tightening sequence for flanges and couplings might look pretty straightforward to a novice, but just applying torque to the first bolt and moving on to the adjacent ones will not work. It is the wrong way to do it. The order in which you tighten the bolts is so crucial in defining the integrity of the joint.
Why is Bolt Tightening Sequence So Important?
To complete a flange joint, whether for power transmission shafts or plumbing lines, the stress variation on the joint components should be controlled properly. For example, the gasket or seal should be compressed evenly on the face of the flange. Therefore, tightening adjacent bolts first when the opposite ones are loose is likely to damage the gasket. The final result is uneven compression, damage to the seal, and leaking joints. See the demonstration below:
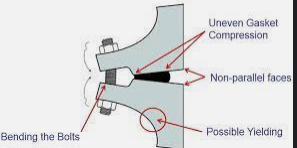
One of the dangers you need to avoid when making a joint for torque transmission through shafts is misalignment. If you tighten bolts on one end of a flange, there is a risk of one part bulging slightly, forming the starting point for shaft misalignment. This might escalate into a serious problem of excess vibration and damage to equipment such as pumps and motors.
The Right Bolt Tightening Patterns
According to the American Society of Mechanical Engineers (ASME), there are multiple options for bolt tightening, which, if followed correctly, can help to guarantee tight joints and leak-free flanges. Below are some of the patterns that you need to know about.
Legacy Pattern and Modified Bolting Patterns
Before you can tighten the bolts, they can be numbered in a clockwise sequence (1, 2, 3, 4, 5 …) or by the tightening order. The two main methods of tightening sequence are the legacy pattern and modified model. Well, each method comes with its pros and cons, but you should go for the one that your team has been trained to use.
Legacy Bolting Patterns
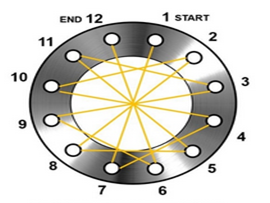
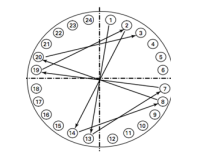
To use the legacy bolting pattern, you need to be very careful and follow an appropriate sequence. A good example is 1, 7, 4, and 10 … pattern to ensure the flange is tightened correctly. See the demonstration of the legacy tightening pattern below:
If the flange you are dealing with is large, perhaps having very many bolts, such as 48-bolt flanges used to connect large pipes in petroleum or wastewater lines, bolts adjacent to each other can be grouped together. For example, bolts 1-4, 5-8, and 9-12 can be grouped together in such order. See the demonstration below. Then, you can use the same legacy pattern that we described earlier, but in this case, tighten all the bolts in each part, such as group 1, group 7, group 4, and group 10 … etc.

Modified/ Alternative Bolting Patterns
Although the legacy bolting patterns are the most recommended options, other acceptable patterns have also been developed over the years. If you opt for the alternative tightening sequences, it is essential to factor in a number of things, such as the seals, industry, equipment, and workforce. So, let's look at some of these alternatives:
- Modified Legacy Pattern
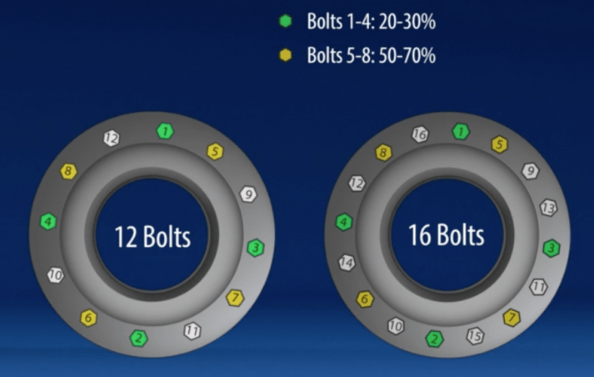
This bolting sequence follows the legacy method, but it allows fewer passes and requires less effort. This is possible because not all the bolts in a machine go through varying torque load amounts. In the demonstration below, you follow the legacy tightening sequence, but the torque exerted on bolts 1, 2, 3 and 4 is 20-30% but bolts 5, 6, 7, and 8 are tightened to about 50-70%. Then, you can repeat the process until all the bolts are tightened to the preferred rates.
- Quadrant Pattern
This is one of the most preferred bolting patterns because it is pretty simple to follow. To use this method, you follow a quadrant type of sequence, and it is recommended for flanges or wheels with more than 16 bolts. The main benefit of this method is that after four bolts are fastened, you tighten the next loose four.
- Simultaneous Multi-Bolt Tightening Patterns
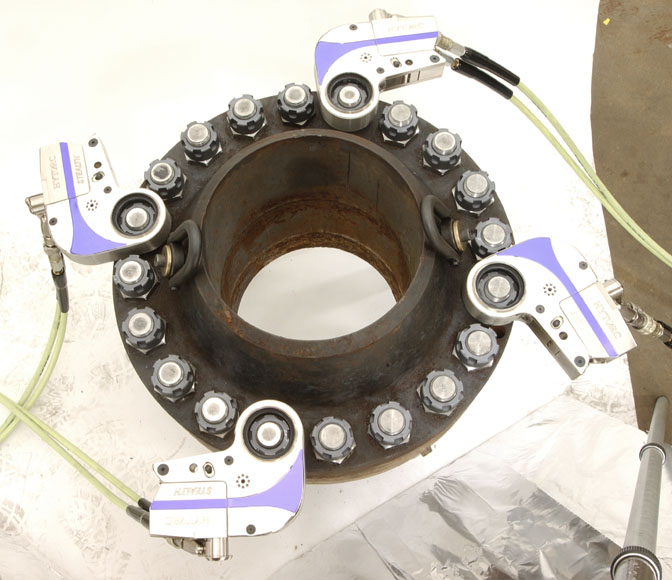
If you are using four tools for tightening bolts, this pattern requires you to maintain equal spacing. The method's main advantage is that it brings parallel closure in a shorter time than working with a single tool. It works best when dealing with large flanges and using hydraulic tools with a single pressure tank (source)
To a new technician, plant manager, or the team leader in charge of maintenance, the bolt tightening sequences we have brought out in this post might look complex, but they are necessary. When you use the proper procedure, it implies you can avoid potentially dangerous occurrences, cut the cost of maintenance, and increase the life of the equipment. Remember to always use the right wrenches or well-designed hydraulic torque wrench to help make the process easy and trouble-free.